How To Trim Your Kerry Blue
by Fern Rogers
© 1992 USKBTC
This article first appeared in the 1992 Kerry Blue Terrier Handbook
What is to follow is by no means absolute law. It is simply our version of how to trim and care for your Kerry Blue. You will find other methods and many different opinions on the subject as you meet and talk with breeders from different parts of the country. We offer this explanation only in the hope that it will help anyone who is trying to learn the basic principles of grooming their Kerry Blue Terrier.
Feet
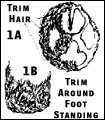
Trim (with scissors) the hair growing between the pads (1A).This keeps your dog from collecting chunks of mud that may irritate his feet, also helping the puppy develop a more compact foot. We usually do the feet when we do the stomach area, and train the puppy to accept being placed on his back for this chore.
Cut the toenails (with toenail clippers- Resco or we prefer Millers Forge.) A bottle of “Monsell’s Solution” is handy to have in case you accidentally cut the nail too short. It stops the bleeding when dabbed on with a piece of cotton. (Tell your prescription counter it’s for veterinary purposes.) Smooth the nails with a metal file. We’ve had success using the “Nail Groom” attachment with sandpaper discs on our Oster clipper. Comb the leg hair down against the foot and cut off any hair that extends beyond the pad. (1B)
Stomach Area
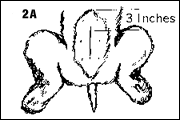
For trimming on the head and stomach area, we recommend the #10 blade on the Oster clipper. The A-2 Oster Clipper is preferred because of the removable head. Place your dog on his back and with your clippers trim his stomach. (2A) Trim to about 3 inches in front of the front edge of the back leg. (About a clipper’s width in front of the penis or an area that includes the back three sets of nipples on a bitch.) Trim the hair on the penis with the clipper also and cut off any hair that
Ears
Gently insert a “q-tip” either dry or one that has beer dipped in Vaseline, into your dog’s ear about half the length of the stick (less for pups). Rotate it slowly in one direction to catch the long hair that grows inside the ear. Remove the stick, pulling the hair out with it. Repeat this process on both ears until no more hair comes out on the stick.
Eyes
Use a cotton ball dipped in Boric Acid Solution (a commercial product that is excellent is Lavoptik) to clean the eyes. Use your metal comb carefully, if necessary to remove all dried matter from the hair around the eyes
Head and Neck
We prefer to outline the ear with scissors before using the clipper- some prefer to remove the excess hair with the clipper first. Start with the ears, (5A) running your clippers against the growth of the on both the outside surface and much of the underneath surface as you can reach easily (trimming the rest with scissors; until tidy.) There is a flap of skin on the back edge of the ear. Find this with your fingers and be careful not to cut it with your clippers or scissors.
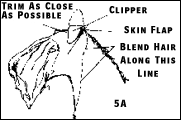
On the head itself there are three “markers” to trim to (5A) the outside corner of the eye (1), the corner of the mouth (2) and the hair follicle (a definite lump) under the chin (3). Trim against the hair in all areas of the head and neck with exception of the very flat top of the head (from the brows back to between the ears.) This particular area depends on how curly or straight the hair may be. If it is quite straight, you will have to trim against the growth. Practice can tell you which you like best. Taper the hair to a longer length with scissors right behind the ears.Some people use the clipper entirely too far down the throat. This is something again that has to be decided by the individual. A show trim should require more blending with the scissors to make the neck blend into the body. If you use a V at the point of the base of the throat (or round it oval shape), be sure not to carry it too low for this can make your dog appear quite short when coming toward the judge. It also may not give the dog as pleasing a front when viewed from the side.
Bath
Now bathe your dog. Place cotton in his ears to keep the water from entering and causing infection. (Don’t forget to remove it after the bath, if it has been placed deeply to keep the dog from shaking it out.) It is not necessary to give your dog a bath every time you trim him, but you can do a much better job of trimming his coat if the hair is clean. If you have hard water, be sure to use a good shampoo such as you would use yourself-it is much easier to rinse out. This last statement is very important. Nothing can cause more irritation than soap left in the coat. Some prefer to brush and comb the coat while drying-for show, we prefer to let it dry with a blower on it-having brushed the dog well before his bath. After the coat has dried in this manner, it will retain more curl and wave characteristic of the breed.
Body
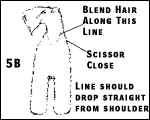
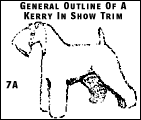
Blend the hair around the clipped areas with scissors. The body coat should be about an inch and a half in length. (For a summer or utility haircut, we recommend using a #5 Oster blade on your clipper to take the body down. This is marvelous to keep a litter of puppies looking neat when they pass the 3 months mark.) Trim the hair on the tail shorter than the rest of the body and be sure the area under the tail is trimmed quite close as well as the rear of the dog. (7A)
Legs
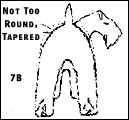
We brush against the hair and then with it (as we do the whiskers and body coat). Use your metal comb in the same manner. (The brush we refer to is called a slicker brush and do not use a real fine comb. Use an English Hinde slicker brush or a finer Warner slicker brush, particularly on puppies. We like the Resco 80M long toothed poodle comb on show coats before using a Resco Medium handle comb.) After you have combed the hair down, lift the foot and shake the whole leg. Then replace the foot and start trimming in a tubular fashion. This will require a great deal of patience and practice. (7A)Looking at your dog from the rear (7B), his legs should form an inverted “V”. Be sure the hips are more tapered than rounded following the body line
Face
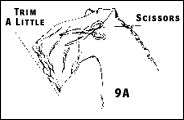
Comb the whiskers forward and with your scissors pointing toward the nose, cut the hair beside the eyes to make them visible.(9A) Trim any extra long whiskers to give them a neater appearance.
